Introduction to Statistical Process Control (SPC)
Statistical Process Control (SPC) is not new to the industry. In 1924, a man at Bell Laboratories developed the control chart and the concept that a process could be in statistical control. His name was William A. Stewart. He eventually published a book titled “Statistical Method from the Viewpoint of Quality Control” (1939). The SPC process gained wide usage during World War II by the military in the munitions and weapons facilities. The demand for products had forced them to look for a better and more efficient way to monitor product quality without compromising safety. SPC filled that need. The use of SPC techniques in America faded following the war. It was then picked up by the Japanese manufacturing companies where it is still used today. In the 1970s, SPC started to gain acceptance again due to the American industry feeling pressure from high-quality products being imported from Japan. Today, SPC is a widely used quality tool throughout many industries.

What is Statistical Process Control (SPC)
SPC is the method of measuring and controlling quality by monitoring the manufacturing process. Quality data is collected in the form of product or process measurements or readings from various machines or instrumentation. The data is collected and used to evaluate, monitor, and control a process. SPC is an effective method to drive continuous improvement. By monitoring and controlling a process, we can assure that it operates at its fullest potential. One of the most comprehensive and valuable resources of information regarding SPC is the manual published by the Automotive Industry Action Group (AIAG).
Why Use Statistical Process Control (SPC)
Manufacturing companies today are facing ever-increasing competition. At the same time, raw material costs continue to increase. These are factors that companies, for the most part, cannot control. Therefore companies must concentrate on what they can control: their processes. Companies must strive for continuous improvement in quality, efficiency, and cost reduction. Many companies still rely only on inspection after production to detect quality issues. The SPC process is implemented to move a company from detection-based to prevention-based quality controls. By monitoring the performance of a process in real-time the operator can detect trends or changes in the process before they result in non-conforming products and scrap.
How to Use Statistical Process Control (SPC)
Before implementing SPC or any new quality system, the manufacturing process should be evaluated to determine the main areas of waste. Some examples of manufacturing process waste are reworked, scrap, and excessive inspection time. It would be most beneficial to apply the SPC tools to these areas first. During SPC, not all dimensions are monitored due to the expense, time, and production delays that would incur. Before SPC implementation, the key or critical characteristics of the design or process should be identified by a Cross-Functional Team (CFT) during a print review or Design Failure Mode and Effects Analysis (DFMEA) exercise. Data would then be collected and monitored on these key or critical characteristics.
Collecting and Recording Data
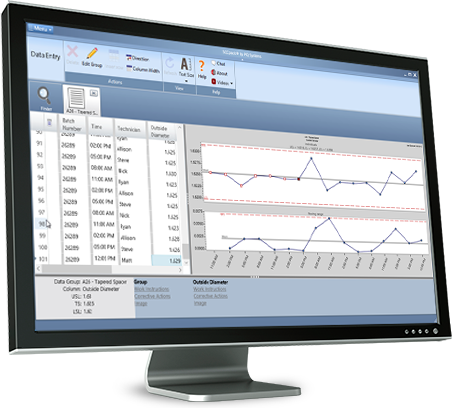
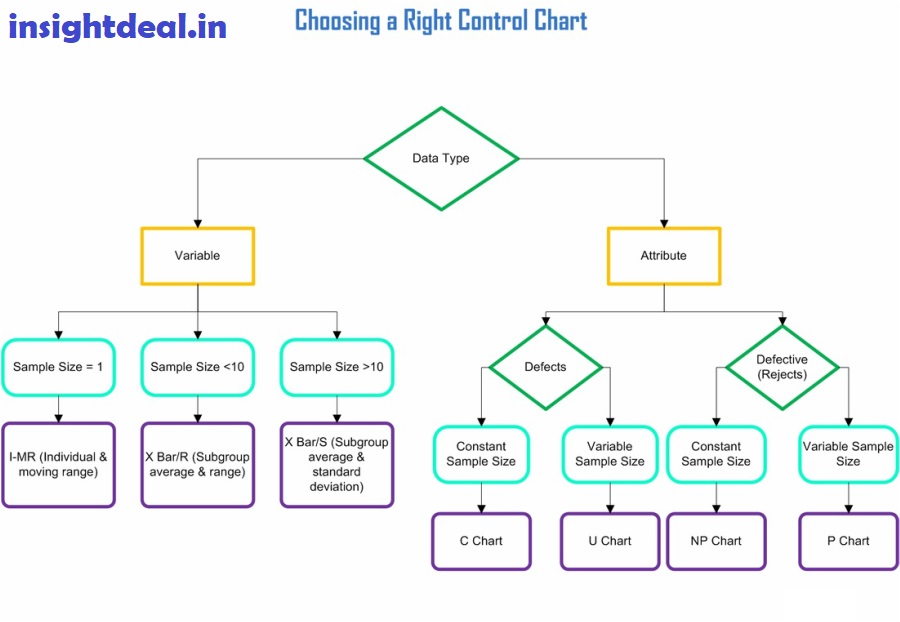
SPC data is collected in the form of measurements of a product dimension/feature or process instrumentation readings. The data is then recorded and tracked on various types of control charts, based on the type of data being collected. The correct type of chart must be used to gain value and obtain useful information. The data can be in the form of continuous variable data or attribute data. The data can also be collected and recorded as individual values or an average of a group of readings. Some general guidelines and examples are listed below. This list is not all-inclusive and is supplied only as a reference.
Variable data
- Individual – Moving Range chart: to be used if your data is individual values
- Xbar – R chart: to be used if you are recording data in subgroups of 8 or less
- Xbar – S chart: to be used if your subgroup size is greater than 8
Attribute data
- P chart – For recording the number of defective parts in a group of parts
- U chart – For recording the number of defects in each part

Control Charts
One of the most widely used control charts for variable data is the X-bar and R charts. X-bar represents the average or “mean” value of the variable x. The X-bar chart displays the variation in the sample means or averages. The Range chart shows the variation within the subgroup. The range is simply the difference between the highest and lowest value. The following steps are required to build an X-bar and R chart:
- Designate the sample size “n”. Usually, 4 or 5 are common sample sizes used in many industries. Remember the sample size should be 8 or less. Also, determine the frequency that the sample measurements will be collected.
- Start collecting your initial set of samples. A general rule is to collect 100 measurements in groups of 4 which would result in 25 data points.
- Calculate the average value for each of the 25 groups of 4 samples.
- Calculate the range of each of the 25 samples of 4 measurements. The range is the difference between the highest and lowest value in each set of 4 sample measurements.
- Calculate the X-bar (the average of the averages), which is represented on the X- bar chart by a solid centerline.
- Calculate the average of the sample ranges or “R” values. This will be the centerline of the Range chart.
- Calculate the Upper and Lower Control Limits (UCL, LCL) for each chart. To be clear, the control limits are not the spec limits set by the engineer on the drawing. The control limits are derived from the data. Most engineers utilize statistical software that will perform the calculations automatically.
Once the chart is set up, the operator or technician will measure multiple samples, add the values together then calculate the average. This value is then recorded on a control chart or X-bar chart. The range of the subgroups is also recorded. The sample measurements should be taken and recorded in regular intervals, including date and time to track the stability of the process. Watch for any special or assignable causes and adjust the process as necessary to maintain a stable and in the control process.
The X-bar and R chart is merely one example of the different control charts available for process monitoring and improvement. For assistance in determining the best practices to improve your processes, contact one of the many professionals at Quality-One.
Analyzing the Data
The data points recorded on a control chart should fall between the control limits, provided that only common causes and no special causes have been identified. Common causes will fall between the control limits whereas special causes are generally outliers or are outside of the control limits. For a process to be deemed in statistical control there should be no special causes in any of the charts. A process in control will have no special causes identified in it and the data should fall between the control limits. Some examples of common cause variation are as follows:
- Variation in material properties within specification
- Seasonal changes in ambient temperature or humidity
- Normal machine or tooling wear
- Variability in operator-controlled settings
- Normal measurement variation
Adversely, special causes generally fall outside of the control limits or indicate a drastic change or shift in the process. Some examples of special cause variation are below:
- Failed controllers
- Improper equipment adjustments
- A change in the measurement system
- A process shift
- Machine malfunction
- Raw material properties out of design specifications
- Broken tool, punch, bit, etc.
- Inexperienced operator not familiar with the process
When monitoring a process through SPC charts the inspector will verify that all data points are within control limits and watch for trends or sudden changes in the process. If any special causes of variation are identified, appropriate action should be taken to determine the cause and implement corrective actions to return the process to a state of statistical control.
There are other variations or patterns of data points within the control limits that should also be tracked and investigated. These include but are not limited to:
- Runs where 7 or more data points are in a row on one side of the process centerline
- Changes in the normal spread of data, where multiple data points fall either farther apart or closer together
- Trends which are represented by 7 or more data points consistently raising or declining
- Shifts in the data spread above or below the normal mean
By addressing any special causes, trends, or shifts in the process we can assure we are producing parts that meet the customer’s requirements. Remember the control limits should always fall between the spec limits determined by the engineer and/or the customer. For more information regarding the SPC process and available tools, mentoring, training, or assistance in the implementation of SPC, contact one of the Subject Matter Experts (SME) at Quality-One. We are always ready to provide any assistance or information you made need.
People Search


